whitealpha
White background remover for 2D game assets — edges repaired, so nothing glows on dark.
whitealpha takes an image sitting on a white background — a game asset, a sprite, a product shot — and makes that white transparent, so you can drop the thing onto anything else. Plenty of tools do that much. What this one also does is repair the edges, so your cut-out still looks right on a dark background instead of glowing at you. It runs on your own machine, needs no AI model and no graphics card, and chews through whole folders at a time.
The halo
Your asset looked fine. You cut it out of its white background, dropped it into the game, and in daylight nobody could tell. Then night fell, and the tree grew a halo.
That halo was there the whole time. The outermost pixels of any soft edge are a mix of the object and whatever was behind it — and what was behind it was white. On a white page you are laying white over white and it is invisible. On a night sky it lights up.
Making those pixels transparent does not fix it, because they are still the wrong colour underneath. They have to be repaired, and that is the part most tools skip.
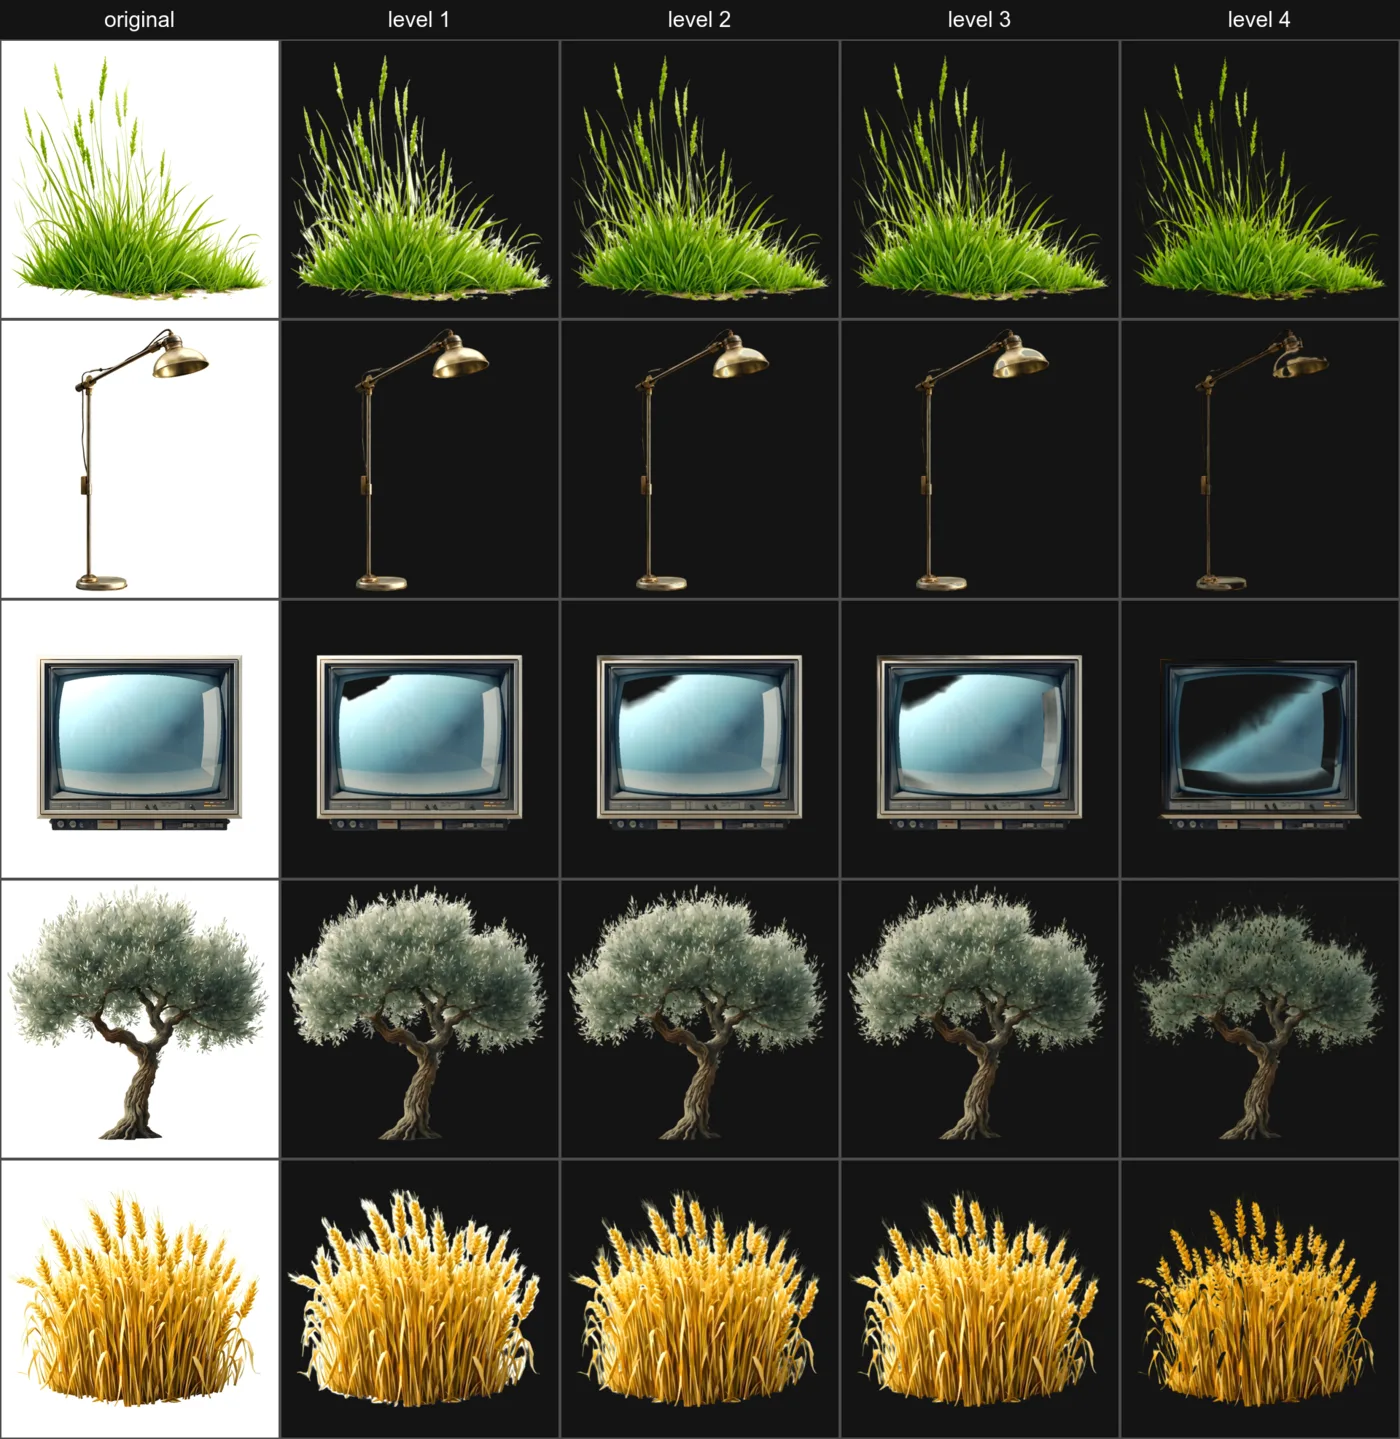
Five assets, four levels, all on black, which is the only background that shows what is left behind. Level 1 on the grass still has white haze at the base. Level 4 on the CRT has eaten the screen, because the screen was almost white and nothing told the tool otherwise. Both are worth knowing before you pick a number.
Why not just use something else
There are two familiar ways to do this, and both leave the halo.
Colour keys — ImageMagick’s -transparent white, GIMP’s Color to Alpha, the
dozens of “make white transparent” web tools. ImageMagick switches pixels on and
off, so edges come out hard and stepped. GIMP is gentler and fades them out
instead. But neither repairs the colour: the white is still mixed into every
edge pixel, it is just semi-transparent white now.
AI cutout — rembg, BiRefNet, remove.bg, Photoshop’s Remove Background. These answer a different question: where is the object? They are good at it, and they still leave a fringe on soft edges, because a pixel that is part leaf and part background has no single right answer. Photograph something against green grass and you keep a green rim; here it happens to be white. They also tend to lose thin structures — the very thing a grass or wheat asset is made of — and they want a model download and usually a GPU.
whitealpha sits between the two, and adds the repair step neither of them does. About four seconds for a 4096×4096 image, and the same input always gives you the same output.
Install
You need Python 3.11 or newer. Everything else is five packages.
git clone https://github.com/ondrejbasegit/whitealpha.git
cd whitealpha
python -m venv .venv
.venv/bin/pip install -r requirements.txt        # Windows: .venv\Scripts\pip
Windows, macOS and Linux all work.
Use
The first argument is how much white goes away.
python whitealpha.py 2 tree.png                  # one image
python whitealpha.py 3 assets/trees              # a folder, sub-folders included
python whitealpha.py # the guide, nothing runs| level | what it does | |
|---|---|---|
1 |
gentle | only near-white goes, and nothing is cleaned up afterwards |
2 |
medium | light backgrounds go, plus a light haze and edge cleanup |
3 |
strong | hazy or overgrown scenes: removes milky haze and edge glow |
4 |
maximum | every whitish pixel goes, even faintly tinted ones |
Not sure? Start at 2 and go up while white is left behind. Assets with a lot of gaps in them — grass, foliage, wheat — usually want 3.
Reads .png, .jpg and .webp. Always writes <name>_whiteAlpha.png next to
the original. The original is never modified, and files this tool wrote
earlier are skipped, so running it twice on the same folder is harmless.
What it cannot do
It only removes white. Not an arbitrary colour, not a green screen.
It cannot tell your white from the background’s white. If a big, genuinely near-white area is part of the object, it will be eaten — that is the CRT screen in the picture above, and it happens even at level 1. The tool decides pixel by pixel on colour alone. It has no idea what a screen is.
It expects a clean white background. A studio photograph with a soft grey gradient behind the subject is a different problem, and that one is what the AI tools are for.
How it works
Two steps.
It builds the transparency gradually, not with a cut-off. A pixel does not flip from solid to gone; it fades across a range, which is what keeps edges smooth instead of stepped. Colourful pixels are protected along the way, so green leaves survive while the pale haze between them does not.
Then it works out what colour the edge really was. This is the part that matters. A pixel that is a bit of leaf and a lot of white background gets the leaf’s actual colour back, rather than a washed-out version of it — which is why nothing glows when you put it on black. The heavy lifting here is done by PyMatting.
From level 2 up there are two extra clean-ups: one clears the milky film left in gaps and thin areas, the other kills the bright outline that only ever shows on dark backgrounds.
Built on
PyMatting does the edge repair, which is the part that makes this worth using. Its method comes from Germer et al., Fast Multi-Level Foreground Estimation (2020).
Licence
MIT — see LICENSE.
Every dependency is permissive: PyMatting (MIT), Pillow (MIT-CMU), NumPy and SciPy (BSD-3-Clause), numba and llvmlite (BSD-2-Clause, with llvmlite also carrying Apache-2.0 with the LLVM exception). Nothing copyleft is linked in.
One footnote: SciPy’s binary builds statically link the GCC runtime library, which is GPL-3.0-or-later with the GCC Runtime Library Exception. That exception exists so linking it imposes no copyleft obligation, on you or on this project.